How to upgrade storage in VPS

Yes, I know the title is not good enough for many of you but not for me. I’m in a hurry when I need this feature. Lucky me, the process is not difficult at all.

Problem. One of vps server that reside in digitalocean need to upgrade the storage as the report told me about the service not run well due to unsufficient storage.

Further investigation tell me the truth.

df -H

Filesystem Size Used Avail Use% Mounted on
/dev/vda1 32G 30G 278M 100% /
tmpfs 523M 0 523M 0% /dev/shm
/home/usertmp_donotdelete
4.0G 12M 3.8G 1% /tmp

Well, only 278M left after delete log file and a few old backup files.

I know if digitalocean provide volume service and now its time to use it 🙂

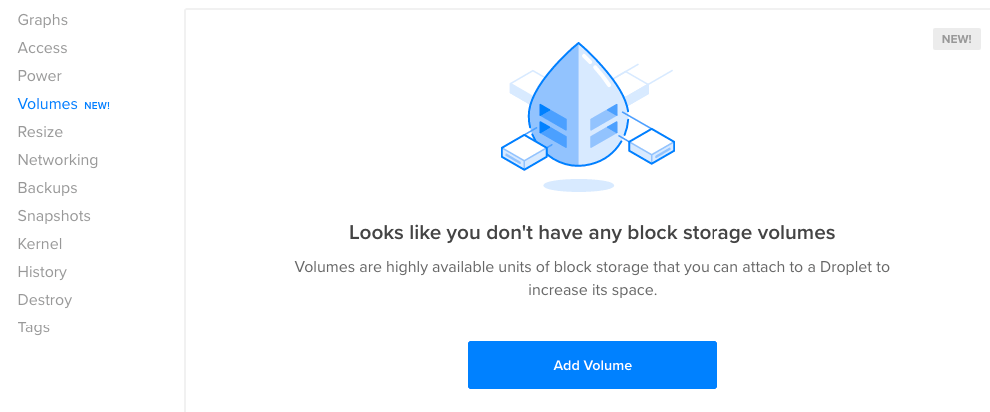
Click the ‘Add Volume’ button lead me to this display.

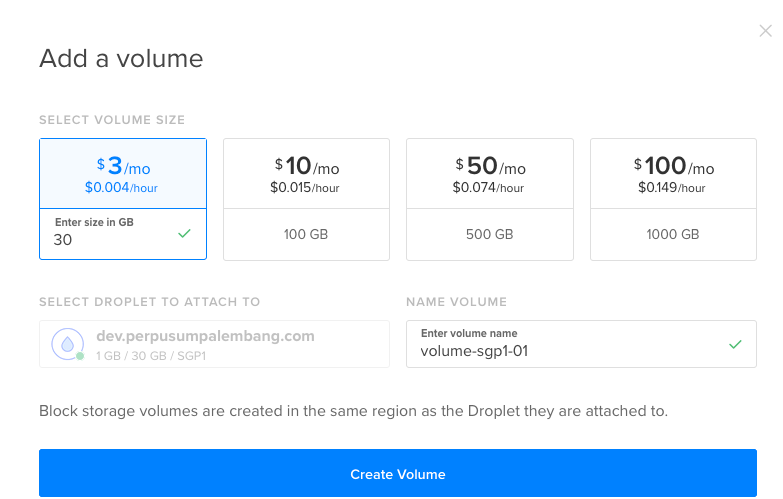
Enter size for this volume and set the name. Hit Create Volume button to start create the space.

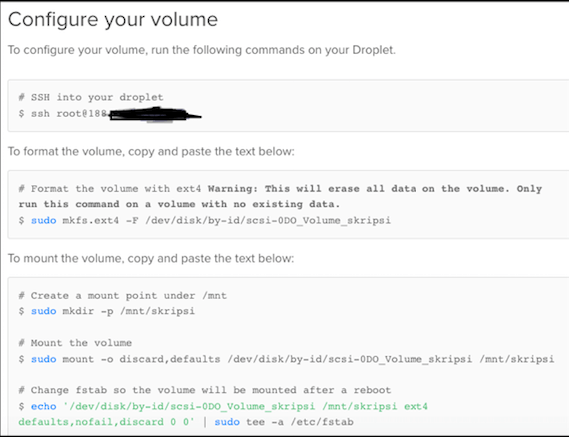
Wow, really cool. You just need to copy and the command. It just works!

Step1 :

sudo mkfs.ext4 -F /dev/disk/by-id/scsi-0DO_Volume_skripsi

mke2fs 1.41.12 (17-May-2010)
Discarding device blocks: done
Filesystem label=
OS type: Linux
Block size=4096 (log=2)
Fragment size=4096 (log=2)
Stride=0 blocks, Stripe width=0 blocks
1966080 inodes, 7864320 blocks
393216 blocks (5.00%) reserved for the super user
First data block=0
Maximum filesystem blocks=4294967296
240 block groups
32768 blocks per group, 32768 fragments per group
8192 inodes per group
Superblock backups stored on blocks:
32768, 98304, 163840, 229376, 294912, 819200, 884736, 1605632, 2654208,
4096000

Writing inode tables: done
Creating journal (32768 blocks): done
Writing superblocks and filesystem accounting information: done

This filesystem will be automatically checked every 36 mounts or
180 days, whichever comes first. Use tune2fs -c or -i to override.

Step 2 :

sudo mkdir -p /mnt/skripsi; sudo mount -o discard,defaults /dev/disk/by-id/scsi-0DO_Volume_skripsi /mnt/skripsi; echo /dev/disk/by-id/scsi-0DO_Volume_skripsi /mnt/skripsi ext4 defaults,nofail,discard 0 0 | sudo tee -a /etc/fstab

Check if mounted

mount

/dev/vda1 on / type ext4 (rw)
proc on /proc type proc (rw)
sysfs on /sys type sysfs (rw)
devpts on /dev/pts type devpts (rw,gid=5,mode=620)
tmpfs on /dev/shm type tmpfs (rw)
/home/usertmp_donotdelete on /tmp type ext4 (rw,noexec,nosuid,loop=/dev/loop0)
none on /proc/sys/fs/binfmt_misc type binfmt_misc (rw)
/dev/sda on /mnt/skripsi type ext4 (rw,discard)

Wow, in less than 5 minutes the job gets done and everyone happy 🙂

Thank You DigitalOcean, good work.

How to update your own Invoice Ninja to latest version

My bad for neglecting so many Invoice Ninja version from latest installation (version 3.2), when I log in I see this message :

A new version of Invoice Ninja is available. You’re running v3.2.0, the latest is v3.4.2

But actual download link lead me to 3.5.1 ( at the time of writing) which make confuse on which path should I choose for updating method :

  1. Update to 3.4.2 first then update to 3.5.1 or
  2. Update to the latest (3.2 to 3.5.1)

Well, Invoice Ninja provide support docs for the case. You can see it here.

But, it would be nice to try it first with dummy server to convince myself and preparing for unexpected issue that might occur.

Lets get start!

  1. Log in to vps server as root

  2. Checking path and ownership

cd /srv/users/serverpilot/apps

ls -l

total 99608
drwxrwxr-x+ 12 serverpilot serverpilot 4096 Jul 7 08:04 invoice
drwxr-xr-x+ 3 serverpilot serverpilot 4096 Jul 7 02:56 invoice_old
-rw-rw-r–+ 1 root root 101977765 Apr 2 20:33 ninja-v3.2.0.zip

ls invoice

CONTRIBUTING.md artisan composer.json gulpfile.js resources
Gruntfile.js bootstrap composer.lock package.json server.php
LICENSE bower.json config phpspec.yml storage
README.md c3.php database phpunit.xml tests
app codeception.yml docs public vendor

as you see from the above result :

path : /srv/users/serverpilot/apps/invoice

ownership : serverpilot (for user and group)

3. Download shell script and save it to a file

copy and paste from ‘raw paste data’ More

How to setup your own Invoice Ninja server with $2.5/mo budget

My friend ask me to test Invoice Ninja on my server. This software is very popular since you can do many things with invoice. This software made with Laravel 5.2 and I’ve test it ‘hard way’ in my vps .I think I can share simpler way to get this software run in affordable vps.

This documentation using Vultr vps smallest server and serverpilot free account. In nutshell, you have great invoice software with free control panel 🙂

Lets get start!

Setup VPS Server

VPS provider is Vultr. They provide the plan with pricing $2.5/month.

I use Ubuntu (14.04 64 bit) with following specs : 512MB and 20GB SSD storage.

After hit deploy button write down these information :

  1. Ip address
  2. username (root)
  3. password for vps server

Setting URL for access Invoice Ninja

I use Simple Zone Editor from my cpanel hosting to set A record for subdomain http://ninja.hostingformula.net

update :

I change my dns manager to cloudflare.

$ dig ns hostingformula.net

; <<>> DiG 9.9.5-3ubuntu0.13-Ubuntu <<>> ns hostingformula.net
;; global options: +cmd
;; Got answer:
;; ->>HEADER<<- opcode: QUERY, status: NOERROR, id: 47657
;; flags: qr rd ra; QUERY: 1, ANSWER: 2, AUTHORITY: 0, ADDITIONAL: 1

;; OPT PSEUDOSECTION:
; EDNS: version: 0, flags:; udp: 4096
;; QUESTION SECTION:
;hostingformula.net.        IN    NS

;; ANSWER SECTION:
hostingformula.net.    84500    IN    NS    naomi.ns.cloudflare.com.
hostingformula.net.    84500    IN    NS    dom.ns.cloudflare.com.

;; Query time: 4528 msec
;; SERVER: 108.61.10.10#53(108.61.10.10)
;; WHEN: Tue Apr 04 05:52:45 UTC 2017
;; MSG SIZE  rcvd: 102

For cloud flare user just assign A record to vps ip address.

This url is not working yet but we’ll working on it 🙂 More

Step by Step Install Guide for Setup Publishing and Collaborate Documents on VPS

My friend who work on library came and asked me to install some component for their test server that will be base of publishing and collaborate documents. He already try the guide provided by Flowpaper but might be confuse on some steps that might be out of date.

He use free vps that located on Japan (actually its free $20 from Vultr) to try the guide but failed on swftools section. I use his vps and change a little bit the procedure on Ubuntu 14.04 64 bit LTS.

Here the steps : ( I log in as root)

Compiler and friends

apt-get update
apt-get upgrade
apt-get install build-essential

Verify its exist

gcc -v
make -v

Create Linux swap in two steps

Check current swap size

free -m

total       used       free     shared    buffers     cached
Mem:           488        427         61          0         13        346
-/+ buffers/cache:         66        421
Swap:            0          0          0

Install swap maker shell script

wget https://raw.githubusercontent.com/Cretezy/Swap/master/swap.sh -O swap

Create 2G swap

sh swap 2G

Welcome to Swap setup script! This script will automatically setup a swap file and enable it.
Root access is required, please run as root or enter sudo password.
Source is @ https://github.com/Cretezy/Swap

Setting up swapspace version 1, size = 2097148 KiB
no label, UUID=e1418ff5-1126-48d8-ac50-d6dd80427752
/swapfile   none    swap    sw    0   0

Done! You now have a 2G swap file at /swapfile

Check it

free -m

total       used       free     shared    buffers     cached
Mem:           488        428         59          0         14        348
-/+ buffers/cache:         66        422
Swap:         2047          0       2047

Install php5

apt-get install php5 unzip

Install pdftk

apt-get install pdftk

swftools

apt-get install swftools

Install pdf2json

mkdir pdf2json

cd pdf2json

wget -c https://github.com/flexpaper/pdf2json/releases/download/v0.68/pdf2json-0.68.tar.gz

tar xvzf pdf2json-0.68.tar.gz

./configure

make && make install


Test flowpaper

cd /var/www/html/

wget -c https://flowpaper.com/GPL/FlexPaper_2.3.6.zip

unzip FlexPaper_2.3.6.zip

cd /var/www/html/php/config/

chmod 777 config.ini.nix.php

chmod -R 777 /var/www/html/pdf

Setting admin etc

enter location of pdf folder and add

/usr/share/swftools

as path of swftools

Done.

Step by Step Install PHP 7 on latest Centos 7 VPS

This title taken from my friend question who want to teach him about install latest php version (current version is 7.0.12) but also need to do it in simple copy and paste way 🙂

I use Vultr $20 instance that will become a server for my friend (he is ios programmer that need lamp server for his project).

Lets get start!

Check available memory

free -m

total        used        free      shared  buff/cache   available
Mem:           1839          89        1331          16         418        1599

Create Swap

Create 4GB swap because the vps instance use 2GB memory : (in general swap space is twice of memory) More

How to Install Multiple PHP version (PHP 5.2, PHP 5.5, PHP 5.6 and PHP 7) in single VPS with Ubuntu 16.04

I need to test the effect of new plugin on new development stage while still preserve production setting. Not in high traffic domain and I also want to learn new framework called phalcon php. Since I want to support newest ubuntu server I came with my requirement list :

  1. Must be able to run on newest Ubuntu (I’m aware about 16.04 LTS)
  2. Must be able to run old PHP version (the latest of 5.2 release is 5.2.17). Even this version is no longer supported by php.net but a few products still rely on this version.
  3. I want to learn Phalcon PHP version 2.0.x .
  4. I also want to compare it with latest version of Phalcon PHP version 2.1.x
  5. Newest PHP version 7 also needed

The list translated into plan :

5.2 -> 5.2.17
5.5 -> 5.5.32 -> phalcon 2.0.10 (latest)
5.6 -> 5.6.18 -> phalcon 2.1 (latest)
7.0 -> 7.0.3

Well, I use Vultr since this vps working well for me for long time and also support iso (yes, I use Ubuntu 16.04 server daily build). (EU) Frankfurt, DE chosen as vps location for this server. 64 bit OS (Xenial Server).

ubuntu16

I also pointing A record for these sub domain. More

How to install PHP 7 GA on CentOs Server

One of blogger in my town came and ask me to help him with his server. Actually his server is enough to handle his wordpress blog but he don’t know what to do. I suggest him to upgrade his server or reinstall server to support latest PHP 7. I told him that newest PHP is twice fast as legacy PHP that he use. I promise to show him the steps and put it public. Maybe other blogger need and find it useful too.

Lets get start!

I use DigitalOcean VPS (1GB package) – You get free $10 if you’re new user.

Choose CentOS 6.7 64 bit with 1 GB memory.

Login to vps and install :

# curl -O https://centminmod.com/installer.sh && chmod 0700 installer.sh && bash installer.sh

Wait till you see # sign . Follow by type

# centmin More

Install PHP 7 and Apache22 on DragonFlyBSD 4.2.4

Using current machine but get faster performance by only upgrade software is a good offer. That feel happen to me when I hear about php 7 release. Being curious I decide to use latest dragonflybsd (at this moment 4.2.4) as pilot project for new hosting infrastructure platform.

Lets get start!

# uname -a

DragonFly php7.hostingformula.net 4.2-RELEASE DragonFly v4.2.4-RELEASE #6: Sun Aug 9 13:25:14 EDT 2015 [email protected]:/usr/obj/home/justin/release/4_2/sys/X86_64_GENERIC x86_64

# pkg info

bind-tools-9.10.2P3 Command line tools from BIND: delv, dig, host, nslookup…
ca_root_nss-3.19.2 Root certificate bundle from the Mozilla Project
cdrtools-3.00_2 CD/DVD/BluRay and ISO-9660 image creation and extraction tools
curl-7.43.0_2 Non-interactive tool to get files from FTP, GOPHER, HTTP(S) servers
cvsps-2.1_1 Create patchset information from CVS
expat-2.1.0_2 XML 1.0 parser written in C
gettext-runtime-0.19.4 GNU gettext runtime libraries and programs
git-2.4.6 Distributed source code management tool
idnkit-1.0_5 Library to handle internationalized domain names
indexinfo-0.2.3 Utility to regenerate the GNU info page index
isc-dhcp42-server-4.2.8_1 ISC Dynamic Host Configuration Protocol server
krb5-1.13.2_2 Authentication system developed at MIT, successor to Kerberos IV
libxml2-2.9.2_3 XML parser library for GNOME
pkg-1.5.5 Package manager More

Cpanel tip : Speed up your wordpress with proper PHP version

I don’t have much money for using expensive web hosting or vps or dedicated server for my wordpress blog. Is there any way to speed it up without touch plugin or something else?

Well, using cache is the best way to achieve blazing fast wordpress but one trick I found is using proper PHP version.

Yes, using latest PHP version is dead simple way to make wordpress faster.

By default cpanel user don’t get latest version, for example in my cpanel I see this :

php-cpanel1

For latest PHP version you can refer to php.net site :

php-cpanel2As you can see there are 3 version :

  1. PHP 5.6.11
  2. PHP 5.5.27
  3. PHP 5.4.43

Since I use cpanel I can not compile nor install latest PHP version as I used to using VPS but I can use closest version to 5.6.11.

Click “select php version” under software and services menu.

php-cpanel3

By default native php (the ones that come with server operating system) will be shown.

php-cpanel4

Choose 5.6 from drop down and click save as current.

php-cpanel5

Of course you can choose extensions. Only use the one that you use. For example if you only use mysql then you need to disable pgsql (postgresql) from extension.

How do I know if I already use PHP 5.6?

Create new file using file manager facility and save it as coba.php with these lines :

<?php

phpinfo();

?>

save and open from web browser. If you see like this one then your previous configuration is working well.

php-cpanel6

Testing PHP 7 on Centos 7

PHP 7 already kick the door with its beta2 while HHVM shadow it 🙂

I want to test it with CentOS 7 minimal installation and $5 quick vps installation let me in.

# yum update

# yum -y install nano

# nano /etc/yum.repos.d/php7-nightly.repo

put these lines (from zend).

[zend-php7]
name = PHP7 nightly by Zend Technologies
baseurl = http://repos.zend.com/zend-server/early-access/php7/repos/centos/
gpgcheck=0

# yum -y install lynx httpd php7-nightly

# cp /usr/local/php7/libphp7.so /etc/httpd/modules/

# systemctl enable httpd.service

# systemctl restart firewalld.service

# echo '<?php phpinfo();?>' > /var/www/html/info.php

# systemctl start httpd.service

Test

php7-nightly

Update : Recommended guide for production PHP 7 on CentOS server, click here.

WordPress and Cpanel main domain

Last Cyber Friday 2014 I got chance to try namecheap hosting. Its shared hosting package that normally priced $9,88/year . The price is only for 1st year but worth to try since I only got it for $0,98. The price is very good but since people often neglect it I prefer to act vice versa. I’ll use this hosting package for my family blog.

Domain and Sub Domain

The blog itself consist from :

1. Main domain

2. 4 sub domain but my wife told me to only activate 3 sub domain.

Size

Size of family blog (main domain + all sub domain is around 500 MB) in zip format.

$ du -sh zip
508M    zip

Traffic

The traffic is not big :

– less than 100 uv (unique visitor) for main domain

– less than 1000 uv for all sub domain (my wife blog is more famous than my blog hahaha). More

How to move Joomla website to VPS

A friend of mine that not seen for years contact me. He had problem with his school website. Headmaster give him order to take care their website that seem to abandoned by current holder. Every time they (school) contact him. No respond and no email. He ask me to see it and if possible solve it immediately.

Update : if you’re in hurry then you can use Fiverr service that will do the job ($5 per site). Click here to see the service.

After ask the website hosting representative we have clues where do we must start.

  1. Create official letter from school about domain ownership.
  2. Scan the letter and send it to hosting company

The process itself is not straightforward as current holder respond to hosting company email and the phone but not respond to us. After a month the progress finally move to right direction. Current holder not paid for hosting fee and that’s the reason for my friend. Contact hosting company and finally they approve account moving and switching.

Since the hosting company suspend the account for its late payment then the website is not accessible anymore and only display ‘account suspended’ message. My friend ask me if I can give him temporary place for their school. I agree to give him a space with exchange. I must do the transfer process myself. I like to see how to transfer joomla based website to vps.

Lets get start!

Backup Joomla Website

Fortunately my friend already download the backup file. Its tar.gz file (backup-11.15.2014_11-29-19_domain.tar.gz ).

Send Joomla backup file to vps

After copying the file to my laptop I initiate transfer using scp.

scp backup-11.15.2014_11-29-19_domain.tar.gz root@ipaddress:/root

the process depend on internet speed and file size. For my case, it took around 1 hour to upload 132MB of file.

Creating New Domain on VPS

I use Easyengine that I use in previous post for host wordpress. Joomla also created with php and utilize mysql. So I choose php+mysql website.

# ee site schooldomainname --mysql

The command will generate all required files including database plus its credentials at /var/www/schooldomainname/ee-config.php

To see database name, database user database password and database host created by easyengine you can use :

cat /var/www/schooldomainname/ee-config.php

Extract Joomla Backup on VPS

I use same VPS that powered by Vultr for WordPress. Time for extract backup file.

# mv backup-11.15.2014_11-29-19_schooldomainname.tar.gz /var/www/schooldomainname/

# cd /var/www/schooldomainname/

# tar xvzf backup-11.15.2014_11-29-19_schooldomainname.tar.gz

# ls
addons     cron          fp              httpfiles  meta  mysql             pds              psql_users.sql    resellerpackages  shell      sslkeys      userdata  vf
bandwidth  digestshadow  has_sslstorage  locale     mm    mysql-timestamps  proftpdpasswd    quota             sds               ssl        suspended    va
counters   dnszones      homedir         logaholic  mma   mysql.sql         psql             resellerconfig    sds2              sslcerts   suspendinfo  vad
cp         domainkeys    homedir_paths   logs       mms   nobodyfiles       psql_grants.sql  resellerfeatures  shadow            ssldomain  userconfig   version

Looks like this backup file created by my friend taken from cpanel backup wizard.

I just need to find out where joomla files and its database located.

Finding Joomla Files + Database

After search for while I can see where is the location of Joomla files. Its in :

homedir/public_html

Database file located in :

mysql

Move Joomla folder to Easyengine public folder

Next step is move joomla folder found from previous step to easyengine folder.

#cd /var/www/schooldomainname

# mv backup-11.15.2014_11-29-19_schooldomainname/homedir/public_html .
# mv tes/backup-11.15.2014_11-29-19_schooldomainname/mysql/schooldomainname.sql .

Edit configuration file of Joomla

The configuration file located in configuration.php . Edit $user, $password and $db .

#nano htdocs/configuration.php

save the file.

Import Joomla Database File

# mysql -udb_user -p db_name < schooldomainname.sql
Enter password:
#

Make Joomla website live

# ee site enable schooldomainame

Thats it. Try to reload it via web browser and everything load fine so far.

My friend happy with the migration process. The load speed is incredible and they can add their content again and if they like it then they can make their own server with Vultr.

Lesson learned :

  1. Never use personal email address as contact, billing etc for school domain. Always use school email address. Beside this touch make everything official also prevent future problem like my friend case.
  2. If possible use the longest period for registering school domain. Yearly renewed domain is not suitable for a school.

How to move wordpress to easyengine based vps

Its almost the end of year. Many offer came and out include hosting. My friend just have her hosting account expire and the reason why she not continue her hosting plan is cost. She got her hosting package last year for $10 (from facebook group). The package cover free domain + 12 month of hosting and when renewal process came she can afford it. Its $104 now. Ten times from previous invoice. She already knew it and try to find other solution to keep her blog alive.

She already red my post about utilize vps. Her blog is using wordpress and she want to try it after she see my other blog that load blazing fast. I told her about Vultr and she could try it for cheapest package.

I promise her to help the migration process in exchange she let me share the process for hostingformula.net reader (I won’t reveal domain name). Hope this useful for others.

Lets get start!

Backup WordPress

In general WordPress is PHP and MySQL application. To backup wordpress the step is quite simple.

1. Backup database

To see all database credentials see wp-config.php content and write it down to notepad or other equal application. I’m lucky the host provide ssh access. So I can use command line for quick access 🙂

# cat wp-config.php

This command will display the content of wp-config.php . If you just want to extract the database essentials use this command : (my assumptions that you already log in with ssh). More

How to Install FreeBSD 10 32 bit on VPS

A reader send me an email. He ask about possibility of install FreeBSD 32 bit on VPS. He just confuse why Vultr not provide custom iso under 32 tab. He think Vultr not support it. I replied to him that he could test it himself. Upload iso file as usual and continue with installation. He not sure and ask me to try and if possible show the process in single post.

Well, I just remember myself when first time I learn install Redhat 6. I loss 4 month of worrying and afraid if fail. In reality it took 2 days for install FreeBSD 4.7 ( one day for download iso and burn it to CD and second day for read installation manual and applied it). I think Vultr is great one. They provide very flexible infrastructure and if I want to back to FreeBSD 4 I can do that too.

My student also free to experiment with their task only by using small 11 inch netbook. Remote to Vultr and free to test the configuration. Fast network and good CPU.

Lets get start!

Choose FreeBSD 10.1 Iso File

FreeBSD 10.1 was released and I want to try install FreeBSD 10.1 32 bit for this experiment.

There is two options available :

Since I’ll have a lot of bandwidth I use DVD version for upload it to custom isos list.

FreeBSD 10.1 iso in Vultr

Connect iso file in virtual iso section More

Cheap Forex VPS Do it Yourself Server

One of my reader shout me an email about his problem. He get free forex vps from his broker after he met required deposit amount but he got disappointed with the quality. Its low end vps that running Windows 2003 and restrict him on EA usage. He don’t know how his broker monitor his vps but when he try to use his VPS running EA for another broker the connection get worst and he got warning. He must utilize the server only for the broker who give him vps not for others. He already search for cheap forex vps but still not sure which one he must choose. Lightweight vps he ever try is not run anti virus and very minimal installation. Only Windows 2003 with built in IE browser. To many networking problem and maintenance force him to abandon his server.

Another consideration is Windows Server 2003 end of life that will happen on July 14, 2015. While newer version need more requirement that mean more money when you deploy newer Windows server. Yes, according to Microsoft Technet the requirement for Windows 2003 server is quite low (x86 based computer need 256 MB recommended minimum and 512 MB minimum for x64 based computer). I think that the only consideration why many forex vps provider out there still deploy this version.

Since he only need stable and cheap vps server for his forex activity he want me to give my opinion. Is he can build his own forex vps server that also easy to use like Windows. I agree to answer and promise him to make a post for his question when time permit. After 2 weeks when I have time I start test possibility of using other operating system other than Windows as Forex vps. I came with conclusion : Yes, he can. He can build his own server and I think the server is stable too. More

How to install Oracle Linux in VPS using custom iso

I used to use CentOS for linux based server, second option is Ubuntu server. Both option taken with consideration about their support. CentOS is free and always came out after Linux Redhat. Ubuntu also free and have their LTS policy that make feel confident deploying it to my server. The problem with CentOS is me actually. I must wait for long time till I get it released but it’s worth. Today, my friend who study in Europe ask me about Oracle Linux. I never know about it and I feel curious. Beside official support of software that required specific OS like HHVM that support Ubuntu server that make me choose Ubuntu server for smooth installation of HHVM then I’ll use CentOS first.

Same principle applied for Oracle Linux. Since Oracle own this OS then I think they have great support related to their product such Oracle database. Other sight I get from their release is not long after Linux Redhat released I see it (Oracle Linux) also come with their version.

In this post I’ll explore how to install oracle linux in vps using custom iso. Oracle linux version 6.6 that released on Oct 21 2014.

Preparation

Upload oracle linux iso

I use vultr for this post. They provide custom iso facility that enable me for use iso link.

Using oracle linux iso file from here and upload it to Vultr.

How to install Oracle Linux in VPS using custom iso : upload custom iso of Oracle linux

More

How to recover email service (google apps) after downtime

One of our friend domain is down due to web hosting problem. Main domain of hosting service is not renewed at proper time and the contact person is not responding. Two things that need to get recovered:

1. Domain and email service

2. Website file and database

Since we don’t know where is the main host reside then nearest option we have is recover email service that fortunately using google apps. Another fortune we have is domain access is in my control so I can recover it quickly. Here the steps :

Update name server to new one

Since the domain registrar is namecheap I can easily use namecheap nameserver. Simply by click :

Domain Name -> Transfer DNS to Us

Change MX record to Google Apps setting

Click Host Management -> Mail Settingssetting google apps record on namecheap

Pick “User” and Choose “automatically set MX records necessary for Google Apps Email.

Save changes.

Click Save changes one more time.

choose mx record to point only for google apps

At this time namecheap will update mx record and user can relax now. Waiting for propagation time (maximum 3 x 24 hours).

You also able to verify setting by using intodns service.

Enter domain name and click report button. Pay attention for result, specially on MX section. If you also see like this one then everything is fine.

mx record result viewed from intodns side

Another work to do after this work is pointing A record to my vps for temporary service.

How to fix hatom error in google webmaster tools : emphaino theme case

I used to visit google webmaster tools for checking error related to my blog. Update new theme, changing hosting, domain propagation sometime went bad after sometime. Google webmaster tools is my friend to detect such error.

When I log in to google webmaster tools I found “exclamation mark” next to “search appearance” of this domain.

hatom_wordpress1

Further click lead me to structured data error.

Wow, 191 item with error.

hatom_wordpress2

Click the number give me ore detail error about blog post that affected with that error.

hatom_wordpress3

Further check using richsnippets tools give me exact error.

hatom_wordpress4

Its seem that I only need to fix ‘updated’ error section. Raymondware give great explanation about other error that might encounter.

Solution :

Login to wordpress admin page :

1. Click Appearance -> Editor

By default you need to look for single.php and see the content.

Looking for ‘date’ section and wrap it with class “post-date-updated”. Unfortunately in my case ( I use Emphaino theme) I must digging more to find relevant php file that contain the target. Its in ‘content-single.php”.

hatom_wordpress5

Change :

<?php emphaino_posted_on(); ?>

Into :

<span class=”post-date updated”><?php emphaino_posted_on(); ?></span>

Save and retry look it up from richsnippet tools.

hatom_wordpress6

The error is gone now 🙂

How to Install Gitlab on VPS for $10 budget under 5 minutes

Update : the title no longer valid since Vultr lowering the price in half. Yes,  for 2GB memory you’ll need $10/month plan.

Yes. The title is taken from email subject 🙂

After I help my friend set spf record for his gitlab I got email from a friend who has a computer course. His student around 400 and he want to give ‘collaboration’ feel to their programming curriculum. He ask me to help him install gitlab with $20 $10 budget.

I told him to use free github.com account or free gitlab.com account but he refuse. He also want his staff has control for their server. I give him a few reference from internet but he got confuse and already dizzy at the first time he saw console 🙂

Due to distance problem I decide to use vps from vultr than using his server. (Actuallly the server is connected to internet using adsl and only fast access via lan connnection that make me worry about the performance.).

Choose provider

Based on gitlab ce (community edition) requirement I need vps that match :

CPU : 2 cores

Memory : 2GB ( for up to 500 user)

Storage : > 20 GB and SSD preferred.

Latency : closest one to my country (check via ping, the lower respond than the connectivity is great).

Based on that requirement I choose $15 $10 package from vultr.

More