
A reader send me an email. He ask about possibility of install FreeBSD 32 bit on VPS. He just confuse why Vultr not provide custom iso under 32 tab. He think Vultr not support it. I replied to him that he could test it himself. Upload iso file as usual and continue with installation. He not sure and ask me to try and if possible show the process in single post.
Well, I just remember myself when first time I learn install Redhat 6. I loss 4 month of worrying and afraid if fail. In reality it took 2 days for install FreeBSD 4.7 ( one day for download iso and burn it to CD and second day for read installation manual and applied it). I think Vultr is great one. They provide very flexible infrastructure and if I want to back to FreeBSD 4 I can do that too.
My student also free to experiment with their task only by using small 11 inch netbook. Remote to Vultr and free to test the configuration. Fast network and good CPU.
Lets get start!
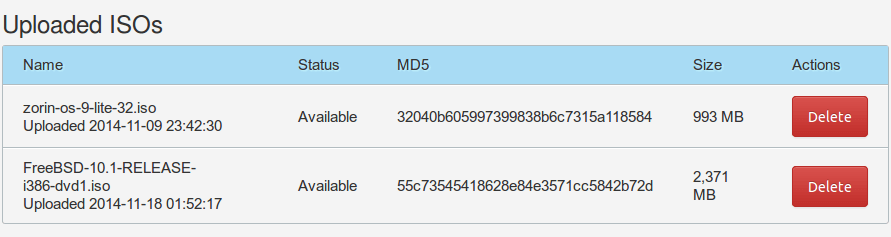
Choose FreeBSD 10.1 Iso File
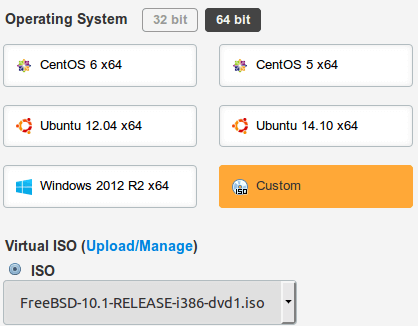
FreeBSD 10.1 was released and I want to try install FreeBSD 10.1 32 bit for this experiment.
There is two options available :
Since I’ll have a lot of bandwidth I use DVD version for upload it to custom isos list.
Connect iso file in virtual iso section
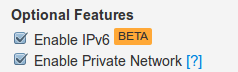
Other setting
Hit Place Order button and the machine will start.
As comparison I also launch another machine that run FreeBSD 10 x64 that already available and support by Vultr.

Miami location already done in provisioning and everything went fine.
Installation
Before I install 32 bit version of FreeBSD 10.1 I login to Miami.
I need to copy a few things from this (x64 FreeBSD 10.1) settings :
1. /etc/rc.conf
Since I enable other setting (IPv6, Local IP) I can see its content for quick.
# cat /etc/rc.conf
hostname=”vultr”
ifconfig_vtnet0=”dhcp”
sshd_enable=”YES”
static_routes=linklocal
route_linklocal=”-net 169.254.0.0/16 -interface vtnet0″
crypto_load=YES
cryptodev_load=YES
aesni_load=YES
virtio_random_load=YES
ifconfig_vtnet0_ipv6=”inet6 2001:19f0:9000:81a3::64 prefixlen 64″
rtsold_enable=YES
ipv6_activate_all_interfaces=YES
rtsold_flags=”-aF”
As I can see from this configuration. Ipv6 and Ipv4 already configured in vtnet0 . vtnet1 still left intact I need to configure it myself (Yes, Vultr already said so).
# uname -a
FreeBSD vultr 10.0-RELEASE-p10 FreeBSD 10.0-RELEASE-p10 #0: Mon Oct 20 12:42:25 UTC 2014 [email protected]:/usr/obj/usr/src/sys/GENERIC amd64
2. top output
I like to see how FreeBSD memory before install anything.
last pid: 3778; load averages: 0.21, 0.20, 0.15 up 0+00:29:47 08:02:45
20 processes: 1 running, 19 sleeping
Mem: 13M Active, 11M Inact, 32M Wired, 6944K Buf, 670M Free
Swap:
PID USERNAME THR PRI NICE SIZE RES STATE TIME WCPU COMMAND
3738 root 1 20 0 86084K 6944K select 0:00 0.00% sshd
3675 root 1 20 0 23984K 5072K select 0:00 0.00% sendmail
3741 root 1 20 0 16988K 2544K wait 0:00 0.00% sh
974 root 1 20 0 14424K 1280K select 0:00 0.00% syslogd
3682 root 1 20 0 16520K 2056K nanslp 0:00 0.00% cron
3778 root 1 20 0 19768K 2480K RUN 0:00 0.00% top
782 root 1 52 0 14556K 608K select 0:00 0.00% dhclient
1129 root 1 20 0 14368K 888K select 0:00 0.00% rtsold
853 root 1 20 0 13584K 4336K select 0:00 0.00% devd
3672 root 1 20 0 60816K 6196K select 0:00 0.00% sshd
3719 root 1 52 0 14420K 1820K ttyin 0:00 0.00% getty
3720 root 1 52 0 14420K 1820K ttyin 0:00 0.00% getty
3725 root 1 52 0 14420K 1820K ttyin 0:00 0.00% getty
852 _dhcp 1 20 0 14556K 1020K select 0:00 0.00% dhclient
3721 root 1 52 0 14420K 1820K ttyin 0:00 0.00% getty
3722 root 1 52 0 14420K 1820K ttyin 0:00 0.00% getty
3724 root 1 52 0 14420K 1820K ttyin 0:00 0.00% getty
3723 root 1 52 0 14420K 1820K ttyin 0:00 0.00% getty
Enough information from Miami and I going back to Chicago for FreeBSD 10.1 32 bit installation.
Installation process is normal like usual. The video below will give you the insight.
As you see network is not connected at this time and I must configure it manually.
The ip address for this purpose located in IPv4 and IPv6 tab.
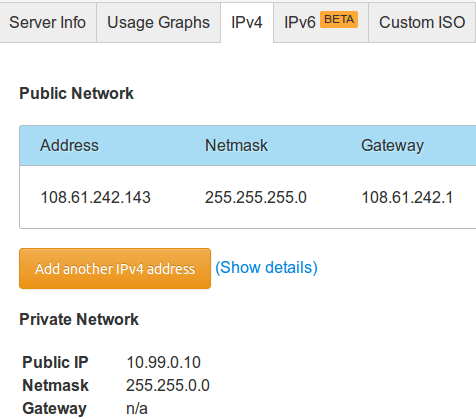
Private network don’t use gateway because public router will handle it.

Setting Network Information
Quick method to input that information is by modify /etc/rc.conf like example from Miami.
I prefer to use bsdconfig
(type the command while logged in console).
#bsdconfig
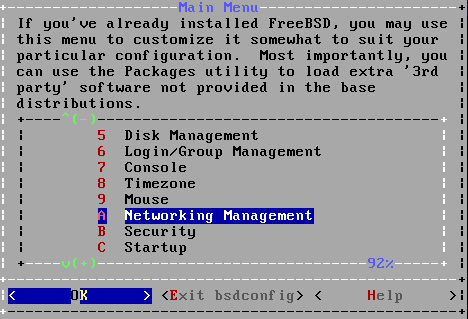
Choose vtnet0 for setting public ip (IPv4 and IPv6).
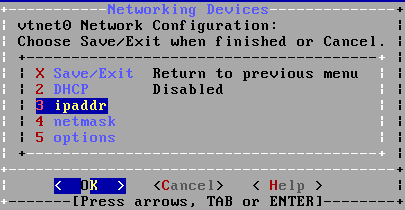
Enter ipaddr, netmask etc.
Setting each interface up and lg in via ssh.
Log in remote only available for user alam (in video) and ssh configuration will block root login by design. User alam is located in wheel group and able to switch to super user.
root@interstellar:/usr/home/alam # uname -a
FreeBSD interstellar 10.1-RELEASE FreeBSD 10.1-RELEASE #0 r274401: Tue Nov 11 22:51:51 UTC 2014 [email protected]:/usr/obj/usr/src/sys/GENERIC i386
Top Output
last pid: 2178; load averages: 0.02, 0.10, 0.14 up 0+01:30:27 16:13:32
21 processes: 2 running, 19 sleeping
Mem: 6708K Active, 18M Inact, 20M Wired, 15M Buf, 690M Free
Swap: 768M Total, 768M Free
PID USERNAME THR PRI NICE SIZE RES STATE TIME WCPU COMMAND
757 root 1 20 0 12940K 4812K select 0:00 0.00% sendmail
2148 root 1 20 0 17900K 6232K select 0:00 0.00% sshd
816 root 1 20 0 10912K 3016K ttyin 0:00 0.00% csh
808 root 1 20 0 10644K 2448K wait 0:00 0.00% login
2153 alam 1 20 0 10628K 2368K wait 0:00 0.00% su
527 root 1 20 0 10128K 1800K select 0:00 0.00% syslogd
2151 alam 1 20 0 17900K 6240K select 0:00 0.00% sshd
764 root 1 20 0 10168K 1940K nanslp 0:00 0.00% cron
2154 root 1 20 0 10912K 2896K RUN 0:00 0.00% csh
455 root 1 20 0 8980K 3432K select 0:00 0.00% devd
2152 alam 1 20 0 10516K 2260K wait 0:00 0.00% sh
729 root 1 20 0 15140K 5688K select 0:00 0.00% sshd
2178 root 1 20 0 11316K 2316K RUN 0:00 0.00% top
760 smmsp 1 20 0 12940K 4484K pause 0:00 0.00% sendmail
812 root 1 52 0 10120K 1740K ttyin 0:00 0.00% getty
809 root 1 52 0 10120K 1740K ttyin 0:00 0.00% getty
813 root 1 52 0 10120K 1740K ttyin 0:00 0.00% getty
814 root 1 52 0 10120K 1740K ttyin 0:00 0.00% getty
You can see how FreeBSD 10 32 bit and 64 bit in action.
Note :
- IPv6 and local network is only useful when you know what you’re doing. If you only expecting ip4 traffic then do not enable it.
Other reference :
Pingback: How to install OpenBSD in VPS using custom iso